IWP6 Help

Interactive Web Physics 6 Tutorials

Table of Contents

Interactive Web Physics 6 (IWP6) features a large database of interactive animations designed for educational demonstrations of fundamental physical concepts. These animations span a wide range of introductory physics subjects, from kinematics to electrostatics. In addition to the large public library of animations available in IWP6, IWP6 also features a animation designed tool which enables teachers and students to develop and explore animations of their own design.

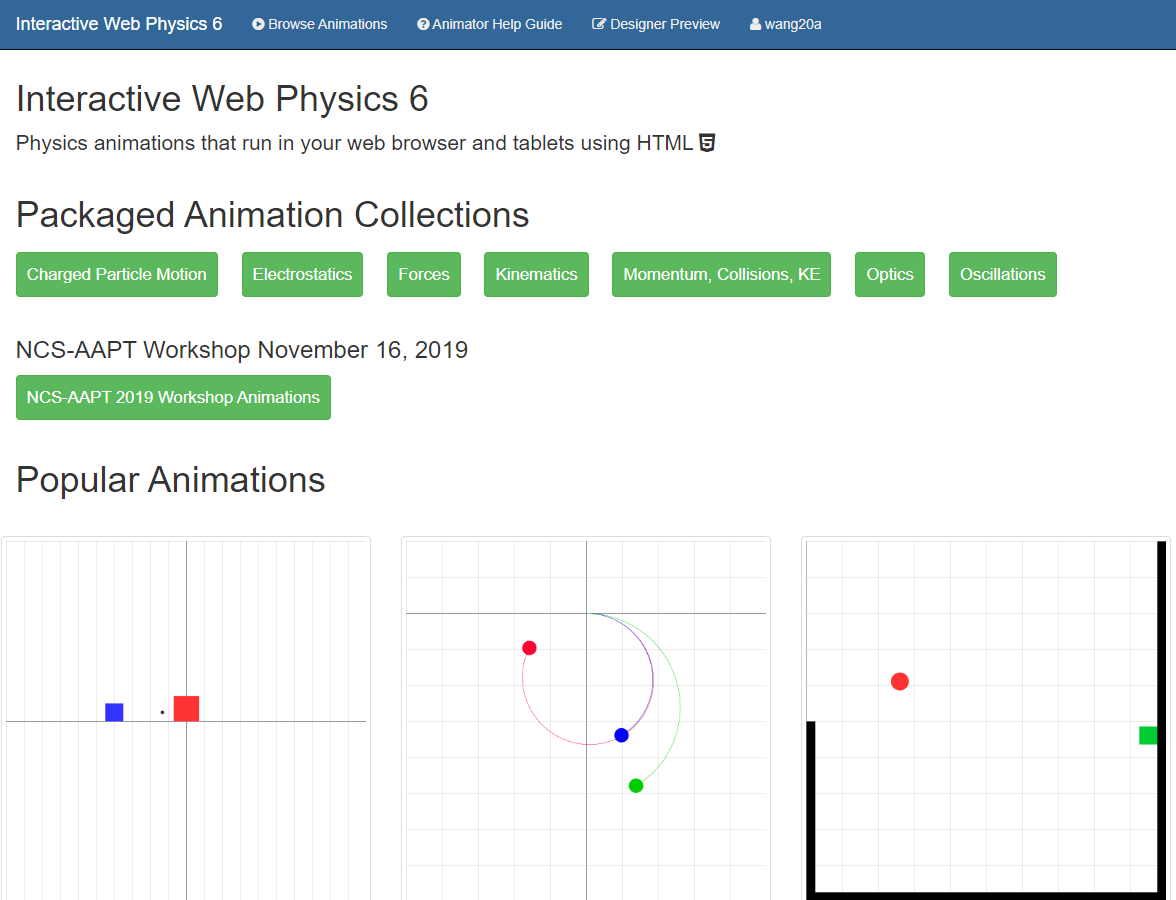
The IWP6 home page (NCS-AAPT Workshop version).

To begin viewing animations, navigate to the homepage by clicking on 'Interactive Web Physics' in the top left corner of any IWP6 page. The homepage includes 7 collections in the 'Packaged Animation Collections' section and features the best of IWP6 in the 'Popular Animations section.' Each animation includes a thumbnail, title, and a brief description. To view an animation, simply click on the animation thumbnail, or the green 'Animate' button, or the blue title link. Press to begin the animation!

Navigating to an animation. You can choose any animation on the homepage to begin.

This tutorial discusses the various aspects of the animation player and how the user can interact with them to change the animation. The IWP6 animation player consists of two central components:

  • Output panel (left)
  • Input panel (right)
The 'Output' panel features the primary animation, which the user can modify by adjusting the parameters in the input panels. The 'Output' panel includes just one tab, the player. The 'Input' panel includes four tabs, which can be toggled by clicking the panel headers at the top of the input panel: The 'Animate', 'Time', and 'Axes' input panels hold parameters which allow the user to change the behavior of the animation. The 'Graph' tab, on the other hand, is independent of the main animation, but displays additional data which complement the main display.

Designer
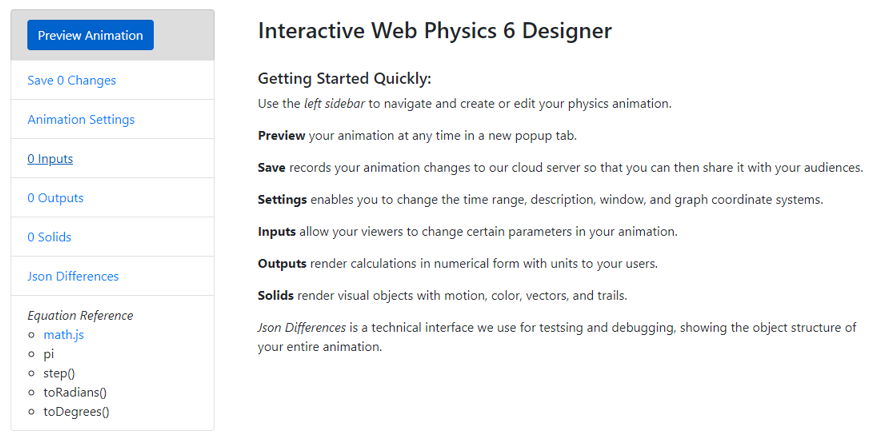
The welcome page of the IWP6 Designer.

The IWP6 designer is a fully functional interface which enables users to edit and create animations. Users with registered accounts can edit any public animation in the iwp-packaged collection through cloning it into the Designer. Unregistered users can access a similar version of the Designer through the 'Designer Preview' option. The Designer features six sections:

These features are built with user-friendliness in mind, allowing users without significant coding experience design animations on their own. With the use of the math.js library, the step function, and other calculators, it is possible to replicate more complicated physical phenomena. By implementing these functions cleverly, we can create animations like those below.

hookeslaw03.iwp Screenshot.
Gravity-Animation-Solution.iwp Screenshot.
In this section, we provide tutorials for navigating the Designer, creating basic animations, and using the various features of the designer and its libraries. Following our brief introduction on getting into the Designer, we provide tutorials on three different animations:

Users can keep track of their own animations through an account collection. If you already have an account, you can sign in by clicking 'Sign In' at the top right of the homepage:

The sign in page.
If you do not have an account, you can email taylor.brockman@gmail.com with the subject: "IWP User Request" to request one. You can edit existing, public animations in the packaged collections by navigating to an animation and clicking 'Clone in Designer' in the top right. Alternatively, you can create animations from scratch by signing in to an account with the 'Sign In' button at the top right of the main page. Once you are signed in, you can click on your profile (also at the top right) to view your:
  • Username
  • Display Name
  • Email Address
  • Public Collection URL
A registered IWP6 Designer account.
You can launch a new animation by clicking the blue 'Launch Designer' button at the bottom of the page, and you can access your existing animations in the 'Your User Animations' section or through your 'Public Collection URL.' When you launch the designer, a welcome page will appear with a quick navigation summary. A new animation by default will begin with 0 inputs, outputs, and solids, whereas in existing animations you will be able to see counts for each kind of object in the left scroller.
An animation cloned in the Designer.

Home Page
The IWP6 homepage.

The home page includes 7 collections:

  • Charged Particle Motion
  • Electrostatics
  • Forces
  • Kinematics
  • Momentum, Collisions, KE
  • Optics
  • Oscillations
The 'Popular Animations' section features the best showcases of IWP6 animations from each collection.

Sorry, but this section is still under development!

Interactive Web Physics 6 Documentation

Table of Contents

Interactive Web Physics 6 (IWP6) features a large database of interactive animations designed for educational demonstrations of fundamental physical concepts. These animations span a wide range of introductory physics subjects, from kinematics to electrostatics. In addition to the large public library of animations available in IWP6, IWP6 also features a animation designed tool which enables teachers and students to develop and explore animations of their own design.

The IWP6 home page (NCS-AAPT Workshop version).

To begin viewing animations, navigate to the homepage by clicking on 'Interactive Web Physics' in the top left corner of any IWP6 page. The homepage includes 7 collections in the 'Packaged Animation Collections' section and features the best of IWP6 in the 'Popular Animations section.' Each animation includes a thumbnail, title, and a brief description. To view an animation, simply click on the animation thumbnail, or the green 'Animate' button, or the blue title link. Press to begin the animation!

Navigating to an animation. You can choose any animation on the homepage to begin.

This tutorial discusses the various aspects of the animation player and how the user can interact with them to change the animation. The IWP6 animation player consists of two central components:

  • Output panel (left)
  • Input panel (right)
The 'Output' panel features the primary animation, which the user can modify by adjusting the parameters in the input panels. The 'Output' panel includes just one tab, the player. The 'Input' panel includes four tabs, which can be toggled by clicking the panel headers at the top of the input panel: The 'Animate', 'Time', and 'Axes' input panels hold parameters which allow the user to change the behavior of the animation. The 'Graph' tab, on the other hand, is independent of the main animation, but displays additional data which complement the main display.

Output Display
The animation 'Player', found on the left hand of each animation.

The output display shows the animated graphs of the primary objects of the animation. The screenshot below shows a snapshot of the animator player for the damped-1.iwp animation. In the top left, the current time of the animation is indicated next to the clock symbol (). The user can interact with the animation using the time functions at the top right:

  • : Step back one frame
  • : Play
  • : Step forward one frame
  • : Reset
The behavior of these buttons is determined by the time parameters in the 'Time' tab. For instance, will continously progress the animation at a pace proportional to the 'Time Step,' stopping once the animation once the current time reaches the 'Stop Time.' / will change the animation by a single time step, and will set the time of the animation back to the 'Start Time.'

Animate Panel
The 'Animate' tab.

The 'Animate' user panel has four components:

  • Title
  • Description
  • Inputs
  • Outputs
The 'Inputs' section contains visible constant parameters of the animation, which the user can adjust to influence the main animation. In damped-1.iwp above, the user can adjust the 'initial position' of the oscillation, the 'mass of the object,' the 'spring constant,' and 'damping coefficient.' The 'Outputs' section shows selected information about the current state of the animation. damped-1.iwp, for instance, shows the undamped and damped frequencies of the current state of the animation. Some animations do not have inputs (or outputs), in which case the 'Input' (or 'Output') section will be absent.

User-accessible parameters (from the 'Input' section, 'Axes' tab, and 'Time' tab) fall into two categories:

  • Initializers: Take effect only once the player has restarted
  • Non-initializers: Take effect immediately, but reset the player when deselected
Initializers include:
  • All 'Axes' settings
  • 'Start Time' and 'Stop Time' in 'Time'
Non-initializers include:
  • 'Time Step' in 'Time'
  • All 'Inputs'
Note: Deselecting any parameter will cause the animation to reset. Suppose, for instance, the user changes the mass of the object in damped-1.iwp while the animation is playing: the animation will continue using the new mass until the user clicks away from the mass input box.

When updating the input parameters of the animation, some changes will only take effect once the player has restarted, whereas others will cause the player to update immediately. Initializers require the player to reset before taking effect, so modifying these parameters will not affect the animation until it has been reset. For damped-1.iwp, 'Initial Position' is an initializer parameter, but the other three parameters are non-initializers. Changing these parameters will immediately affect the animation and cause a noticeable discontinuity in the behavior of the animation.

Graph Panel
The 'Graph' tab.

If appropriate, some animations may have a 'Graph' panel which displays supplementary visual information in addition to the main display. Like the 'Player' tab, the 'Graph' panel updates continuously, showing graphs of certain variables vs time. These variables may include:

  • xPos
  • yPos
  • xVel
  • yVel
  • xAccel
  • yAccel
The user may toggle these variables by clicking on their labels to the right of the graph. As shown in the animation for planetary-system-retrograde.iwp above, when the variable is highlighted, it appears in the 'Graph' section.

Time Panel
The 'Time' tab.

The 'Time' tab holds three parameters:

  • Time Step: time difference between frames
  • Start Time: time of animation upon reset
  • Stop Time: length of animation
These parameters affect how the time functions on the main display ( ) behave (see 'Player'). The time step of the animation determines the accuracy of the animation and the speed of the animation. In the animation above for planetary-system-02.iwp, the large time step causes the animation to show visibly polygonic orbits, instead of the expected circular orbits of a planetary system. Increasing the time step will also increase the speed of the animation proportionally; e.g. a 2x larger time step will play the animation 2x faster.

Note: Typically, the 'Time Step' is only used to control the speed of an animation. For Euler's method animations, however, the 'Time Step' also determines the accuracy of the animation.

The 'Start Time' determines the current time of the animation immediately after a reset, and is usually zero by default. The 'Stop Time', on the other hand, determines when the length of time that the animation will play before stopping. In other words, the 'Stop Time' represents the relative stop time, rather than the absolute stop time.

For instance, an animation with a 'Start Time' of 1 second and a 'Stop Time' of 2 seconds will finish at a Time of 3 seconds, 2 seconds after the 'Start Time'. Once the current time of the animation reaches the 'Stop Time', the animation will automatically pause. It is impossible to progress the animation past the 'Stop Time' without increasing the 'Stop Time'. will immediately repause the animation, and will do nothing.
Axes Panel
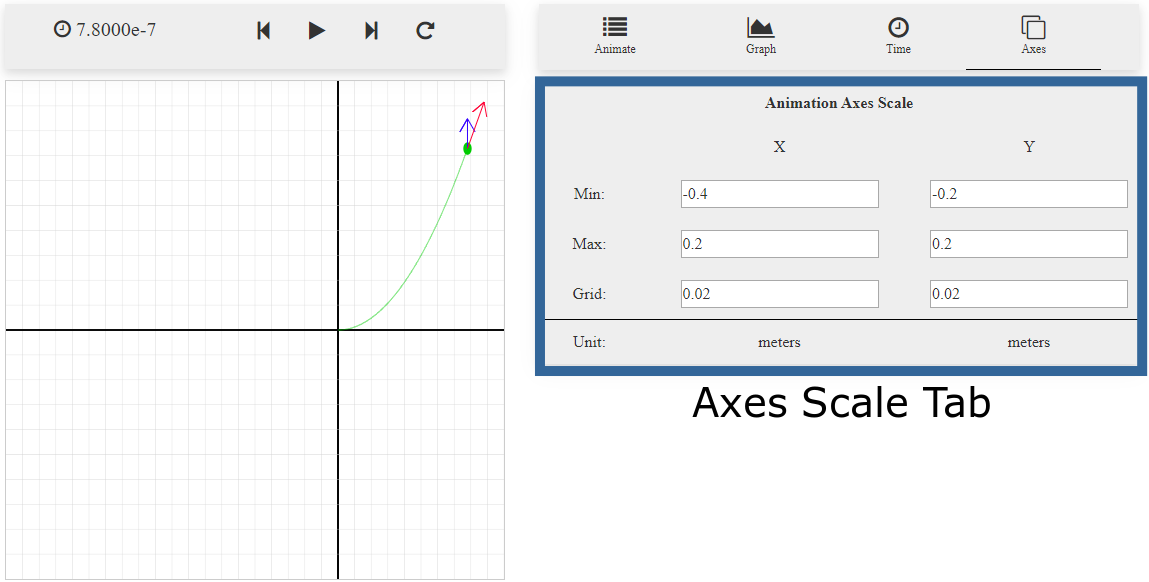
The 'Axes' tab.

The 'Axes' tab contains two axes scales: the 'Animation Axes Scale' and the 'Grid Axes Scale.' The 'Animation' scale controls the window of the main animation in the 'Player' tab and the 'Grid' scale controls the window of the graph in the 'Graph' tab. Each scale includes:

  • X Min
  • X Max
  • X Grid: Horizontal between gridlines
  • Y Min
  • Y Max
  • Y Grid: Vertical between gridlines
X and Y values are separated into two columns, as shown in the animation above for cp-efield-02.iwp. For each of the X- and Y-axes, there are three parameters: Min, Max, and Grid. The Min value determines the lowest value visible on the respective axis in the main display, and similarly for the Max value. The Grid parameter represents the spacing between grid lines along each axis. For instance, an X-Grid spacing of .02 will produce vertical lines .02 units apart.

Designer
The welcome page of the IWP6 Designer.

The IWP6 designer is a fully functional interface which enables users to edit and create animations. Users with registered accounts can edit any public animation in the iwp-packaged collection through cloning it into the Designer. Unregistered users can access a similar version of the Designer through the 'Designer Preview' option. The Designer features six sections:

These features are built with user-friendliness in mind, allowing users without significant coding experience design animations on their own. With the use of the math.js library, the step function, and other calculators, it is possible to replicate more complicated physical phenomena. By implementing these functions cleverly, we can create animations like those below.

hookeslaw03.iwp Screenshot
Gravity-Animation-Solution.iwp Screenshot

The 'Save Changes' section allows you to name your animation and review your edits in the Designer before committing them to the packaged version. The 'Animation Filename' shows what your animation will be saved as in your collection. If you already have an animation by the same name, it will be overwritten when you save, so be careful. By clicking the blue 'Save # Changes' button, you will commit any recent edits to the packaged version online. This will replace the existing packaged animation with one identical to the 'Animation Preview,' found in the top left corner of the Designer.

The 'Save Changes' tab of the Designer. Changes have been made to the animation settings, inputs, outputs, and solids.
The 'Unsaved Change Log' section shows what changes you have made since your last save. They are ordered with the most recent edits first, and provide information on the editor, event, and specific changes made. If you are unhappy with your recent edits, you can reset the animation to the last save by reloading the page.

Note: Your edits will not save if you close the tab.

The 'Animation Settings' tab allows you to modify the animation information and various setting defaults. There are five main sections:

  • Author information
  • Time range: default time settings given in the 'Time' tab and frame rate (fps)
  • Description: a brief summary of the animation, shown on the 'Animate' tab
  • Window: x- and y-axis minimums, maximums, spacing between grid lines, and units for the 'Player' (the main animation)
  • Graph window: x- and y-axis settings for the 'Graph' tab
The 'Animation Settings' tab.

The 'Inputs' tab. Several inputs have already been generated in this animation.

The 'Outputs' tab. This tab very similar to the 'Inputs' tab, but the outputs are defined via calculators instead.

The 'Solids' tab.

The 'Json Differences' tab. The 'Json Viewer' provides a view into the animation which is closer to its raw code, while the 'Json Differences' tab shows how the Json properties of the animation have changed.
Home Page
The IWP6 homepage.

The home page includes 7 collections:

  • Charged Particle Motion
  • Electrostatics
  • Forces
  • Kinematics
  • Momentum, Collisions, KE
  • Optics
  • Oscillations
The 'Popular Animations' section features the best showcases of IWP6 animations from each collection.

Sorry, but this section is still under development!